How to Installing 12v fntled deck lights A Step-by-Step DIY Guide
Outdoor deck lighting is a simple yet effective way to enhance your space’s ambiance, safety, and usability. Among the various options, installing 12v fntled deck lights are increasingly popular due to their energy efficiency, longevity, and user-friendly installation process. Whether you’re a seasoned DIY enthusiast or new to home improvement projects, this guide will provide detailed instructions to help you install 12V LED deck lights successfully. From planning the layout to completing the setup, every step will be explained to ensure a seamless experience.
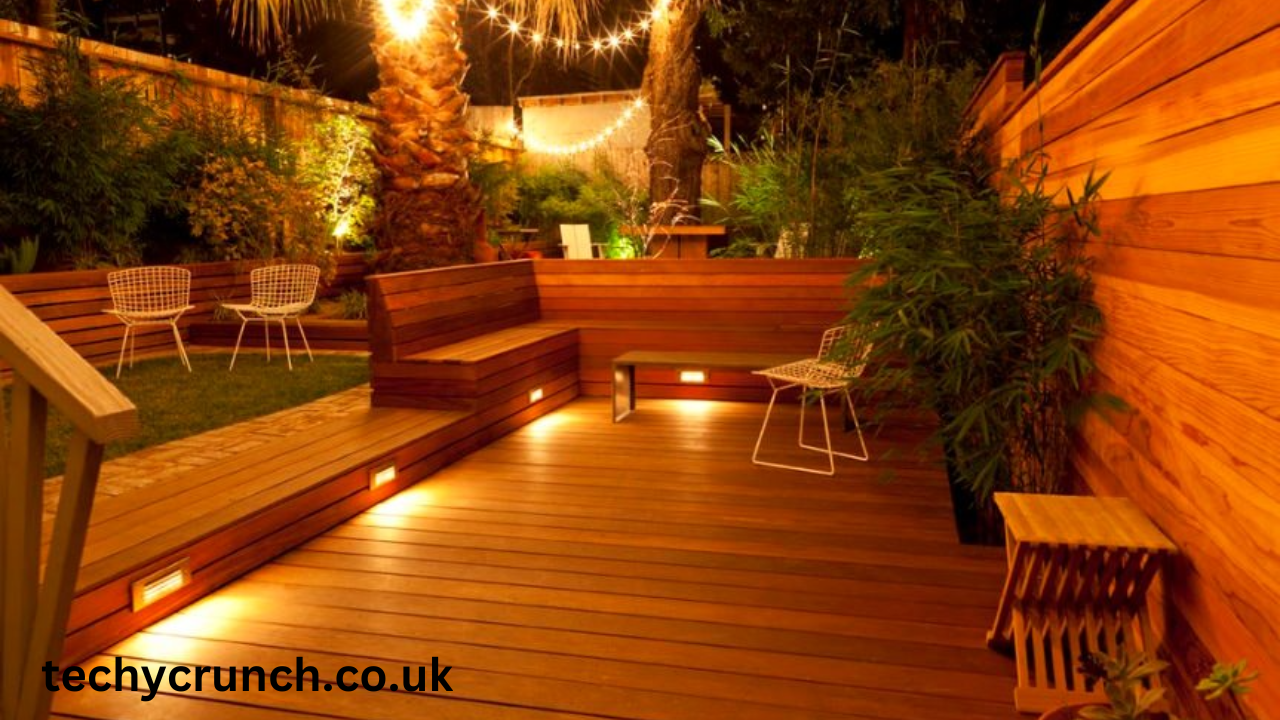
Benefits of installing 12v fntled deck lights
Before diving into the installation process, let’s explore why 12V LED lights are a top choice for deck lighting.
Energy Efficiency
LED lights use much less energy compared to conventional bulbs, making them an energy-efficient and environmentally friendly option. The 12V low-voltage system further minimizes energy consumption.
Safety
Operating at 12 volts, these installing 12v fntled deck lights pose less risk of electrical shock compared to higher-voltage systems, making them safe for outdoor use, especially around children and pets.
Durability
LED deck lights are built to endure outdoor conditions, being waterproof, UV-resistant, and capable of withstanding temperature changes, which helps them remain functional for many years.
Longevity
LED lights typically outlast incandescent and halogen bulbs by a significant margin, often lasting for tens of thousands of hours before they need to be replaced.
Design Versatility installing 12v fntled deck lights
Available in various colors, shapes, and sizes, these lights can be tailored to suit your design preferences, enhancing your deck’s aesthetic appeal.
Essential Tools and Materials
To ensure a smooth installation, gather all necessary tools and materials beforehand.
Tools
- Drill and Drill Bits: For creating precise holes for the lights.
- Measuring Tape: To evenly space the fixtures.
- Wire Strippers and Cutters: For preparing the electrical connections.
- Crimping Tool: To secure wire connections.
- Screwdriver: For assembling components.
- Voltage Tester: To verify the system’s functionality.
- Cable Clips or Staples: For neatly securing wiring.
Materials
- 12V LED Deck Light Kit: Includes lights, connectors, and cables.
- Transformer: Converts household 120V power to installing 12v fntled deck lights.
- Outdoor-Rated Electrical Tape: To seal and protect connections.
- Weatherproof Junction Box (optional): For organizing wiring.
Step-by-Step Guide to Installing 12V LED Deck Lights
Step 1: Plan the Layout
Proper planning ensures an efficient installation process and optimal lighting coverage.
Determine Placement
Identify where you want the lights installed. Popular options include along steps, the deck’s perimeter, and railing posts.
Measure and Mark
Use a measuring tape to determine even spacing for the lights. Mark these points with a pencil or marker to avoid confusion later.
Assess Power Requirements installing 12v fntled deck lights
Calculate the total wattage of the lights in your system. Ensure the transformer can handle the load. For example, if each light consumes 3 watts and you plan to install 10 lights, the transformer must support at least 30 watts.
Prepare the Deck
With your layout finalized, it’s time to prepare the deck for installation.
Drill Holes
Using a drill bit that matches the light fixture size, carefully drill holes at the marked locations.
Clear Obstructions
Remove any wood splinters, dust, or other obstructions from the drilled holes to ensure a smooth installation.

Install the Transformer
The transformer is essential for converting the household power supply to the installing 12v fntled deck lights.
Select a Location
Place the transformer near an outdoor power outlet. Make sure the location is protected from the elements, either being weatherproof or shielded from rain and direct sunlight.
Mount the Transformer
Secure the transformer to a stable surface, such as a wall or deck frame, using screws provided in the kit.
Connect to Power
Plug the transformer into a GFCI (Ground Fault Circuit Interrupter) outlet to ensure safety during operation.
Lay the Wiring
Proper wiring ensures a clean and functional lighting system.
Run the Main Cable
Starting at the transformer, lay the main cable along the planned light installation path. Ensure the cable is hidden by routing it under the deck boards or along the railing.
Secure the Cable
Use cable clips or staples to fasten the wiring securely to the deck structure.
Cut and Strip Wires
At each light location, cut the cable and strip about 1/2 inch of insulation from the ends to expose the copper wire for connections.
Connect and installing 12v fntled deck lights
Once the wiring is set up, you can proceed to connect the lights to the system.
Connect the Light Fixtures
Match the positive (+) and negative (-) wires of the light fixtures to the corresponding terminals on the main cable. Use waterproof connectors or a crimping tool to secure the connections.
Install the Lights
Insert each light fixture into its designated hole. Push firmly to ensure a snug fit. If your lights require screws for mounting, secure them in place at this stage.
Test the System
Before finalizing, turn on the transformer and check that all installing 12v fntled deck lights are functioning correctly. Address any issues, such as loose connections or flickering, immediately.
Finalize the Installation
Complete the setup by securing and protecting all components.
Seal Connections
Wrap all exposed wire connections with outdoor-rated electrical tape to protect against moisture and dirt.
Organize Excess Wiring
Coil and store any excess cable neatly in a weatherproof junction box or beneath the deck.
Adjust the Lights
Fine-tune the position of each light to ensure they illuminate the desired areas effectively.
Maintenance Tips for 12V LED Deck Lights
To keep your deck lighting system functioning optimally, regular maintenance is key.
Inspect Connections
Regularly inspect all wire connections for any signs of wear or looseness. Tighten or replace connectors as needed.
Clean Fixtures installing 12v fntled deck lights
Over time, dirt and debris may build up on the light fixtures. Clean them with a damp cloth to maintain brightness and clarity.
Check for Damage
Inspect the cables and fixtures for physical damage caused by weather or animals. Replace any damaged components promptly.
Replace Faulty Lights
If a light stops working, replace it with a compatible LED bulb or fixture to avoid overloading the transformer.
Troubleshooting Common Issues
Lights Not Working
- Verify that the transformer is plugged in and powered on.
- Check the outlet with another device to confirm it’s operational.
- Ensure all wire connections are secure.
Flickering Lights
- Confirm that the transformer’s capacity matches the system’s total wattage.
Uneven Brightness
- Check for voltage drops caused by long cable runs. Reducing the distance between the transformer and farthest light may help.
Enhancing Your Deck Lighting System
Once your basic lighting system is set up, consider these upgrades to elevate your outdoor experience:
Smart Controls
Integrate smart controls to automate your lighting. Features like scheduling, dimming, and remote operation via a smartphone app can make your deck lighting more convenient and efficient.
Color-Changing LEDs
Add a festive touch to your deck with RGB or color-changing installing 12v fntled deck lights. These lights can be customized to match holidays, celebrations, or your mood.
Integrated Landscape Lighting
Extend your lighting setup to include pathways, gardens, and other outdoor areas.
Conclusion
Installing 12v fntled deck lights is an excellent way to improve your deck’s functionality, safety, and aesthetics. By following this comprehensive guide, you can achieve a professional-quality installation that complements your outdoor space. The low voltage, energy efficiency, and durability of LED lights make them a practical and stylish choice for any homeowner.
Take the time to plan, execute, and maintain your system for years of enjoyment. If you’re uncertain about electrical work, consult a professional electrician to ensure your system is safe and compliant with local codes. With the right approach, your illuminated deck will become a favorite gathering spot for family and friends.